DAY ONE
1. Introduction to Habitats (10 minutes - Review)
Talk to students about the habitats of various animals that live around your school. Then think about animals living in different places around the world. A habitat is an ecological or environmental area that is inhabited by a particular animal or plant species. How do animals create a “home” for themselves. Where do animals live in your region of the world?
Talk to students about common and exotic animals they have seen at the zoo and in their neighborhoods. Bears hibernate in caves, birds create nests in trees and moles burrow under the ground.
How do animals use local materials to respond to the local environment? The availability of grasses often defines the kinds of nests birds create. Some birds use their own saliva to create nests in the absence of more "conventional" materials.
Explain the concept of biomimicry - the use of natural structures as inspiration for our everyday life. Use the database at
www.asknature.org to explore some examples of biomimicry in action.
2. Local Field Study (45 minutes Investigate)
Take students on a field study of their local area. Arrange a field trip to a local nature center, or take students on a neighborhood walk. Create a field guide of common animals and habitats you would likely see on your walk. Divide students into field study teams - one team can observe things in the sky, one those on the ground and yet another can dedicate themselves to studying structures found in trees.
Create sketches of animal habitats using observations from your field study. Illustrated books from the library or online can also be inspiring. Encourage students to inspect the structure, shape and overall forms of the habitats they observe.
DAY TWO
1. Local Habitats, Local Architecture (10 minutes - Frame/Reframe)
Now begin to talk to students about the kinds of buildings and design we see most frequently. Do these structures in any way resemble the architecture of animal habitats? Why or why not?
Lead a discussion using some of these questions: What could be some benefits of using animal habitats as inspiration for new designs and architecture? How can our local environment help us with clues for good architecture and design for the earth and our bodies?
Discuss the findings of your field study to encourage responses and examples. Next, begin to define and characterize the local region as a class. On the board create a series of prompts for students to fill in, including:
• Common Animals of the Region
• Climate
• Region of the Earth
• Common Plants of the Region
• Rocks, Mineral and other Non-living things
Encourage students to research information that will help create content for each of these prompts. Lastly, announce that in the next session, students will be challenged to design a structure for humans using animal habitats as a model.
Use this table to help identify your bioregion:
|
Geographic/Eco Regions
|
Sub Regions
|
Principle Plant Communities
|
|
The Great North
|
|
|
Tundra (no trees)/Sea Ice
|
|
Taiga/ Boreal Forest
|
|
|
Great Lakes
|
|
Birch/ Beech Forest
|
|
Appalachians
|
|
Deciduous/ Hardwood Forest
|
|
Southeast
|
|
S. Pine/ Cypress Swamp
|
|
The Great Prairie
|
|
Grasslands (Native Gamma and Buffalo Grass
|
|
The Rockies
|
|
Mountain Forest and Meadow
|
|
Deserts of the West
|
|
Juniper/Sagebrush Scrub; Creosote Scrub
|
|
The Pacific Coast
|
|
Northwest Coast
|
|
California
|
|
|
Cedar/Redwood Temperate Rainforest
|
|
Riparian Oak/Chaparral
|
|
|
Islands of the Pacific/Hawaii
|
|
Volcanic floor/tropics
|
2. Habitat Design Lab: Part One (20 Minutes - Generate)
Brainstorm to come up with ideas and sketches of animal habitats students saw on their field study or neighborhood walk. Focus these concepts by asking each student to create a design for a new zoo exhibit. Using the animals found in your region, each student should come up with one design that would provide a suitable, healthy habitat for holding the animal in captivity.
Next, further these designs by asking students to begin sketching a similar design, this time intended for human use. Encourage students to use designs that mimic the shape, form or function of their particular habitat. Make sure students include labels and descriptions.
To provide examples, discuss some major habitat types with students:
• Cave Dwellers - Many animals, from bears to wildcats, use caves as a home. In a cave there is very little light, but a lot of protection. Materials are usually rock or compacted soil.
• Nest - Thousands of species of birds create nests each year for their young. High up in trees, on the side of cliffs or even on the ground - nests are made from a lot of different materials: grass, twigs, mud, saliva, dead leaves and other available materials.
• Burrow - Many small mammals, reptiles and amphibians burrow under the ground. Creating long caves or open chambers, the burrow protects the animals from predators, the hot sun or a cold night. Burrows are usually made in soft, soil earth areas, but can also be found in underwater habitats or in the dessert.
• Grass Land - Many different kinds of animals live in a grassland ecosystem. Tall grasses protect antelope and small mammals from being seen by predators. Each night the grass is pushed back to create a small area for sleeping.
• Bee Hives - Bees use an ingenious honeycomb architecture that exploits the world’s strongest shape - the hexagon. The ubiquitous bee hive and honeycomb shape has been used for centuries in everything from hair styles to fuel cells.
3. Activity Extension: Hyperbolic Coral Reefs
Coral reefs are a vital habitat for thousands of different species of aquatic life and plants. Using the 2010 National Design Triennial's case study about the Institute for Figuring’s Coral Reef project, talk about oceanic habitats and some of the looming environmental threats facing many coral reef habitats around the world. The Coral Reef project has raised awareness about these concerns by inviting communities around the world to add to a large-scale installation composed of crocheted pieces of coral that have formed a collaborative reef. The Institute has instructions on how to add to the reef on their website here:
https://crochetcoralreef.org/makeyourown/teachers.php
Information about the Coral Reef Project can be found in the 2010 National Design Triennial:
• The Bleached Reef: The Bleached Reef is a small part of a much larger installation known as the Hyperbolic Crochet Coral Reef, which is being orchestrated by twin sisters Margaret and Christine Wertheim of the Los Angeles-based Institute for Figuring. The Crochet Reef project was conceived in 2005 by the Wertheims as a response to the devastation of coral reefs worldwide due to the effects of global warming, increasing water temperatures and the acidification of our oceans.
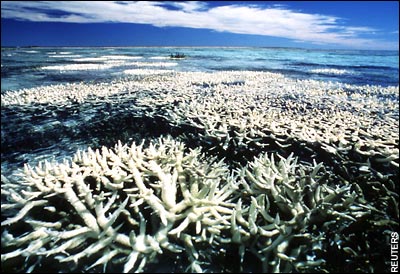
An image of a real bleached reef off of the Australian coast (Telegraph.co.uk)
4. Habitat Design Lab: Part Two (30 minutes - Edit and Develop)
Once a sketch and final idea have been approved, allow each team to create a 3D model or diorama of the habitat they have designed for both zoo and human use. Bring in a broad assortment of materials for the students to work with, including natural materials, clay and cardboard. Have students reproduce their habitat-architecture sketches in 3D. Students should keep track of the materials that they use and be prepared to discuss their designs using labels and notes.
Bring the habitat to life by having each student write a story about the design they have produced. Encourage students to write a story from the perspective of the animal that inspired the structure. (Share and Evaluate)
Read your stories to each other alongside the habitat creations. If space is available, display the models, sketches and stories around the school or classroom.